Testing an Outboard Power Pack
The power pack controls ignition output to the coils. A bad power pack can cause no spark, weak spark, intermittent spark, or loss of one or more cylinders.
Complete guide: Outboard Ignition Testing Guide
Related ignition tests: Switch Box Testing | Stator Testing Guide | Ignition Coil Test | Regulator/Rectifier Check | Trigger Timer Base Testing
Testing an outboard power pack involves verifying spark at the coils, checking stator and trigger resistance with a multimeter, and using a Direct Voltage Adapter, or DVA, to test peak voltage while cranking. A failed power pack commonly shows no spark output, while heat-related failures may work cold and quit once the engine warms up.
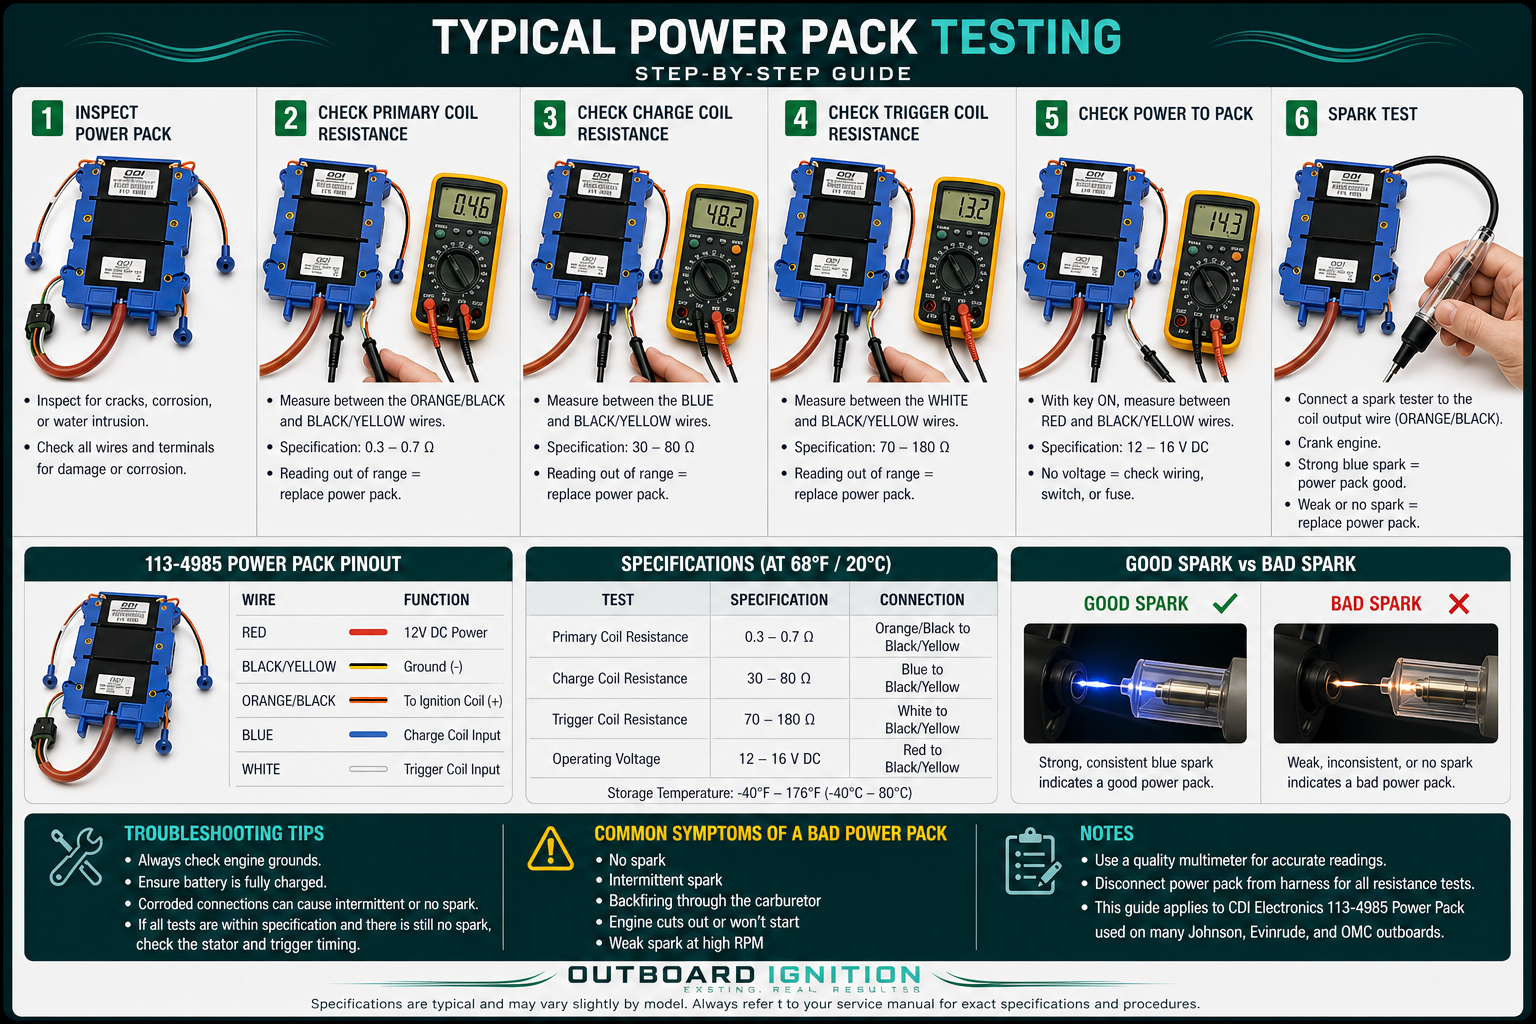
Power Pack Testing Overview
Preparation Before Testing
Spark Test: Check All Cylinders
- Connect a spark tester: Use an adjustable spark tester instead of holding a plug wire near ground.
- Crank the engine: Check spark strength and consistency on every cylinder.
- Identify the pattern: Determine whether one cylinder, one bank, or all cylinders have no spark.
- Swap ignition coils: If one cylinder is dead, swap the coil with another cylinder and retest.
- Watch where the problem goes: If the no-spark condition follows the coil, the coil may be bad. If it stays on the same power pack output, the power pack or input signal may be the issue.
DVA Test: Most Accurate Power Pack Diagnosis
A DVA adapter is the preferred tool for ignition diagnosis because it allows a digital multimeter to read peak voltage. This is important because ignition pulses happen too quickly for a regular meter to display accurately by itself.
- Connect the DVA adapter: Attach the DVA adapter to your multimeter and set the meter to the proper DC voltage range.
- Test stator input: Measure peak voltage from the stator to the power pack while cranking.
- Test trigger input: Measure trigger or pulser coil voltage into the power pack while cranking.
- Test power pack output: Check output from the power pack to the ignition coils.
- Compare readings: Compare the readings to the service manual or ignition specification chart for your exact engine.
Ohm Test: Stator and Trigger Resistance
- Disconnect the related leads: Isolate the stator and trigger wires from the power pack before measuring resistance.
- Set the meter to ohms: Use the correct resistance range for the circuit being tested.
- Check charge coil circuits: Measure resistance across the stator charge coil leads and compare to specification.
- Check pulser or trigger circuits: Measure resistance across trigger/pulser coil leads and compare to specification.
- Check for shorts to ground: Test each lead to clean engine ground where the manual requires it.
Many ignition systems have published resistance values for charge coils and pulser coils, but the exact numbers vary widely. Do not condemn a power pack based on a generic ohm number. Use the correct specification for your engine model.
12 Volt Test Light Check
- Use a small 12 volt bulb: A low-current test bulb may be used on some systems as a rough output indicator.
- Connect between power pack output and ground: Follow the exact wiring point for the system being tested.
- Crank the engine: A faint pulsing glow may indicate that the power pack is attempting to fire.
- Use only as a quick check: This does not replace DVA testing or manufacturer specifications.
Common Signs of a Bad Power Pack
Common Causes of Power Pack Failure
Interpreting Results
Browse Related Ignition Parts
Use these categories after confirming your engine brand, horsepower, year, serial number, and original part number.
Before You Order
For best fitment help, have your engine brand, horsepower, model year, serial number if available, old part number, wire colors, spark test results, resistance readings, and DVA readings ready.
(918) 457-4099If the power pack works cold but fails after warming up, test again when the problem is happening. Heat-related failures are often missed when testing a cold engine.